Guitar Amp Modelers with GarageBand on a Mac G3
GarageBand, part of Apple's iLife, is a great entry-level Digital Audio Workstation (DAW) application. GarageBand includes many features that the pro-level apps would require a software plug-in or external hardware module for. One of these built-in features are a wide selection of software instruments that can be played with a MIDI keyboard. Another feature is a guitar amp modeler. This feature allows a guitarist to plug directly into their Mac without needing a real amp. The signal is recorded clean with the amp simulation applied in real-time. Because the sound is recorded clean, it allows the amp settings to be changed at any time.
Amp modeling tends to be very processor intensive, and can bring some older computers to their knees. My Powerbook G3 "Pismo" has a 500MHz G3 processor, and will not allow the use of GarageBand 2's built-in amps in real-time. The effect could be applied after recording, but I prefer hearing the amplified guitar while I play. This is where third-party software helps out.
|

|
 |
Amp Modeler Applications & Plug-Ins
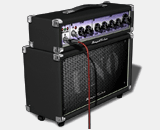
IK Multimedia offers several versions of its AmpliTube guitar amp modeler software with a range of prices and features to choose from. AmpliTube Live is a stand-alone app that gives you a choice of 3 different amps, 3 EQs, 3 cabinets and 4 effects. AmpliTube LE is a plug-in version for use with DAW apps such as ProTools, Deck, or GarageBand. AmpliTube UNO is a paired-down free version with only one amp, one cabinet and one effect. IK Multimedia also offers AmpliTube 2, although I have not tried it yet - the system requirements are too steep for my old Macs. For that matter, AmpliTube 1 supposedly requires a 667MHz G4 processor, although it seems to run just fine on my slower Macs.
AmpliTube Live & LE
I was able to test the demo of these on several Macs: Powerbook G3 "Wallstreet", Powerbook G3 "Pismo", and PowerMac G4 "Sawtooth". Both Live and LE performed flawlessly for live playing and recording.
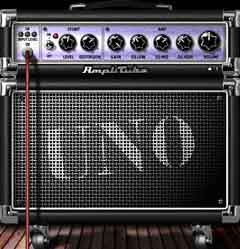
AmpliTube UNO
Several third-parties (ie. AudioMIDI, and MacMusic) have partnered with IK Multimedia to offer up a free version of AmpliTube. UNO simulates a Marshall JCM800 amplifier along with a distortion pedal effect. It sounds great, yet it doesn't offer nearly as many options as its older brothers. Unfortunately, there is no plug-in version of UNO for recording purposes. You can only play live.
|
|
 |
Getting Your Amplified Sound Into GarageBand
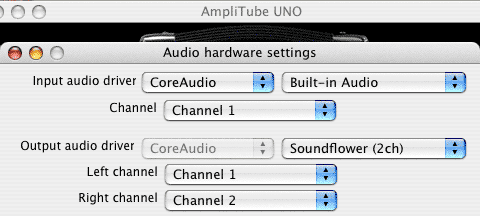
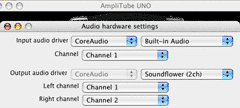
Another freeware program steps in to help out with recording from AmpliTube UNO. Cycling '74 created Soundflower, a system extension that allows re-routing of audio signals through your Mac. Think of it like a patch bay. For our setup, we will want Our guitar input to go straight to AmpliTube UNO; the amped sound to go through Soundflower and into GarageBand. If you then turn on monitoring for a new track in GarageBand, you'll be able to hear what you're playing.
The most surprising thing about this setup is that it uses far less processing power than simply using GarageBand's built-in amps.
There are drawbacks to this method, however:
Your new guitar track is recorded with the amp modeling already applied. If you later decide to change to different amp settings, you'll need to re-record the track. This is similar to recording while playing through a real amp. AmpliTube and GarageBand each add a small amount of latency, so you may hear a short delay between what you play and what you hear.
|
|
 |
Minimizing Latency
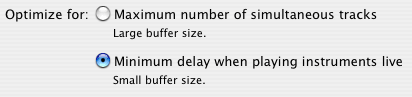
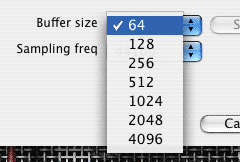
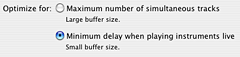
AmpliTube and GarageBand each have settings for buffer size. AmpliTube offers several options based on Kilobytes (KB). GarageBand offers two opions; large and small. You'll want the buffers to be as small as possible to minimize latency. If you go too low, then you may hear clicks, pops and drop-outs. Just bump it up until you get a clear sound.
|
|
|
Step-by-Step Illustrated Guide
1) Change AmpliTube's sound output to Soundflower.
2) Decrease AmpliTube's buffer size.
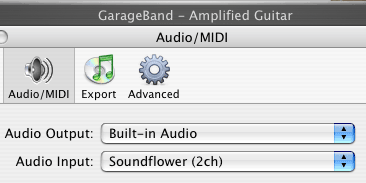
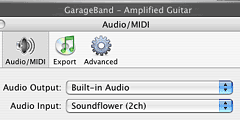
3) Change GarageBand's sound input to Soundflower.
4) Decrease GarageBand's buffer size.
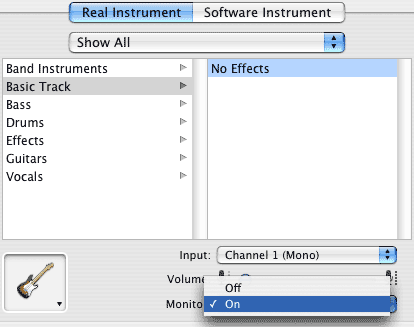
5) Create a new basic track in GarageBand. Turn on monitoring. Feel free to give it a guitar icon if you'd like.
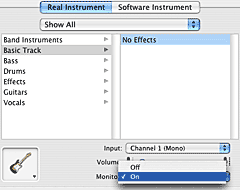
6) Your new track should already have the Record Enable button turned on. (If it is not on, then turn it on now.) You should be able to hear your amplified guitar. The VU meter should also be active. Feel free to rename your track to something more appropriate than "No Effects"

|
|
|
Recording Other Instruments
After you've had some fun recording your amped up guitar, you probably want to lay down some other tracks to accompany it (or perhaps the other way around). If you want to record vocals, you will need to change the GarageBand sound input to Built-in instead of Soundflower. If you are using a FireWire or USB input device, you'll want to select that instead. This procedure can easily be neglected, so it is worth mentioning it here.
|
|
If you found this article helpful, please send me an email to let me know. If you've got a finished GarageBand project you'd like to share, send along an MP3 file. I love hearing new music.
GarageBand and the GarageBand logo are trademarks of Apple. AmpliTube and the AmpliTube logo are trademarks of IK Multimedia. ProTools and Digidesign are trademarks of Avid. Deck is a trademark of Bias, Inc.
This article was last edited July 18, 2007.
> Back to Thoughts & Ramblings
|
|
|